menu

Microsoft released it's latest office suite in September of 2010, which in my opinion is a huge leap forward in terms of usability and responsiveness from earlier versions available for the Mac. Included in the office suite is Outlook 2011, a step up from the monstrosity known as Entourage, which was a watered down attempt at bringing Outlook to the Mac since OS9.
With so many features and knickknacks under the hood, there has to be an easy way to make a HTML email signature with an image right? WRONG! Once again, Microsoft has made it extremely difficult to include complex email signatures, especially those that include remote images.
But fear not! Today, we're going to walk you through how to create these complex HTML signatures, and also include a remote image. This isn't the first "how-to" that explains how to achieve this, but not many go over including a remote image that doesn't come in the inbox looking like there's an attachment associated with it.
Step 1
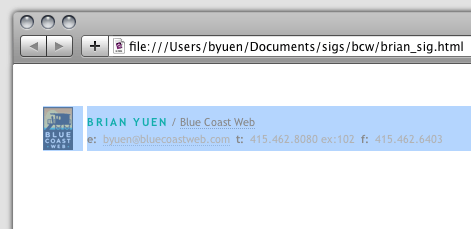
Decide what sort of information you want to display on your signature. For this demonstration, we'll use first/last name, email, telephone, company name and logo.
Step 2
Create your signature in your HTML editor of choice (or download the one that's available in the download link below and edit it with your plain text HTML editor). If applicable, upload your image to the web server taking note of the public path and inserting it into your HTML signature. For the more advanced users, Basic inline CSS is alright to use, as long as it's not used to position items...tables only!
Step 3
Once you have your email signature designed and laid out just as you like, save the file to your Desktop and call it "signature.html" and review it if you wish.
Step 4
Open the "signature.html" file that you've just created in Chrome or Firefox (not tested with other browsers)
Step 5
With the browser open and on the foreground and your signature file displayed, press Command + A on your keyboard to "Select All"
Step 6
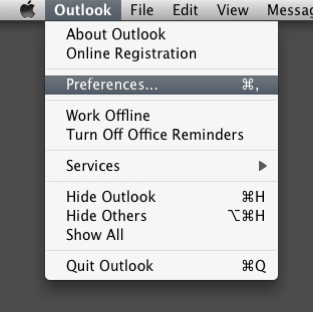
Open Outlook Select "Preferences" and "Signatures"
Step 7
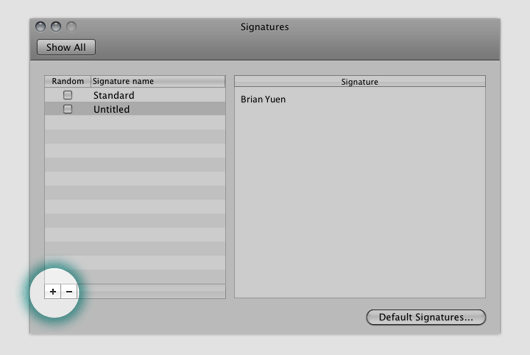
Click the plus button on the lower left to create a new signature. If there’s content in the big right signature window after you've clicked the plus icon, delete it. In my case, it was displaying my first and last name.
Step 8
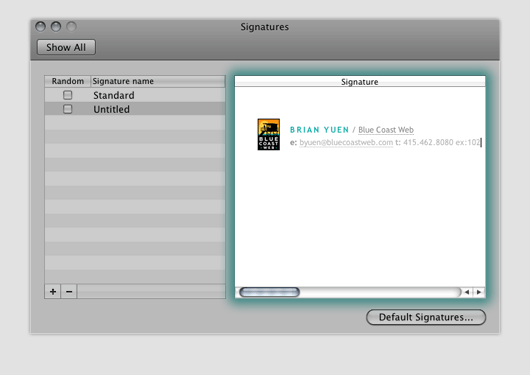
Press Command + v on your keyboard to paste in your signature that you copied from your browser
Step 9
Set your "Default Signatures" and rejoice!
Download the HTML email signature template here.


